Struggling with your portraits? You might find my E-book helpful. Click here
Learning to “see in planes” takes practice, but it’s one of the most rewarding skills you can develop as a portrait artist. During the time I practiced drawing the Asaro head, I think I never got one perfect. But my teacher encouraged me to just keep drawing. The goal wasn’t to get perfect angles on the face — the real practice was training our eyes and brain to see the planes naturally. And as a result, we started to clearly recognize the light, midtones, and shadows on any face we looked at.
Here are some simple exercises you can try to strengthen that skill:
1. Squint and Simplify
One of the easiest ways to start is by squinting at your reference or model. Squinting blurs the small details and helps you focus on the big masses of light and shadow. Ask yourself: Where does the light hit directly? Where does it turn away? Try dividing the face into three tones — light, midtone, and shadow. This limited range forces you to simplify and think structurally, just like sculptors do before refining.
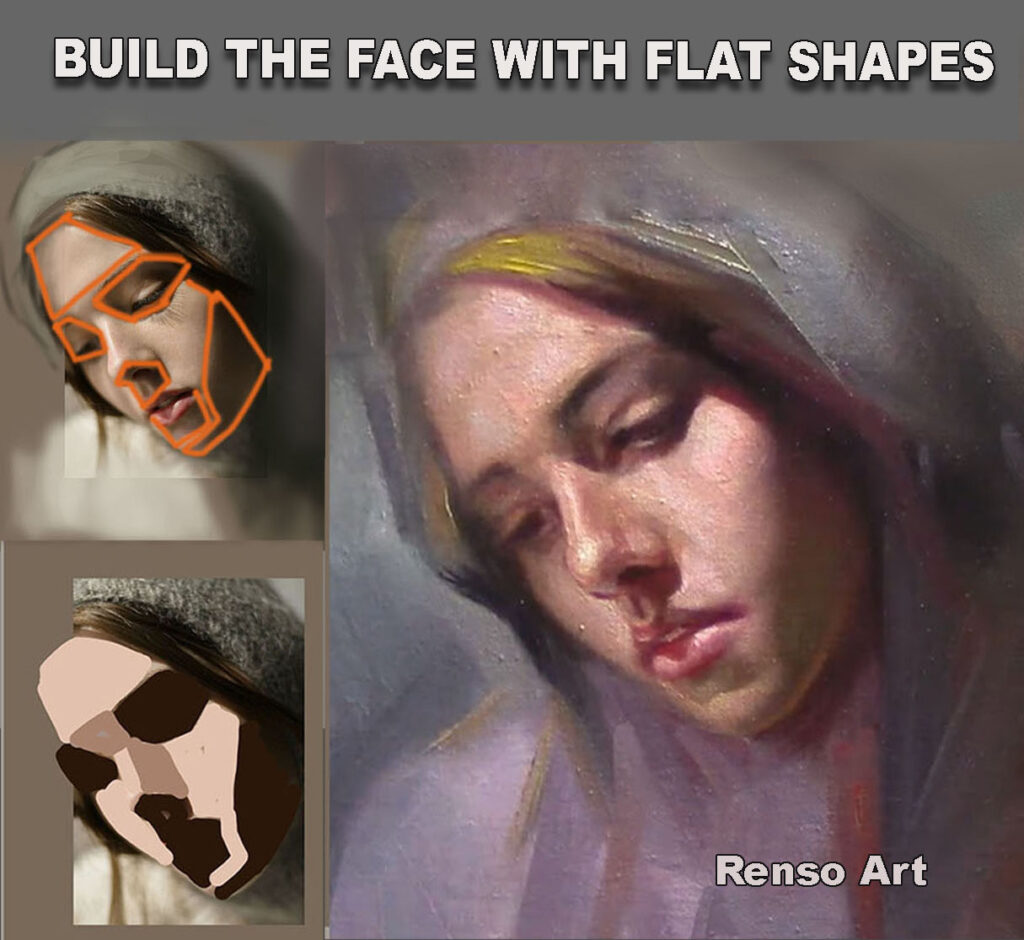
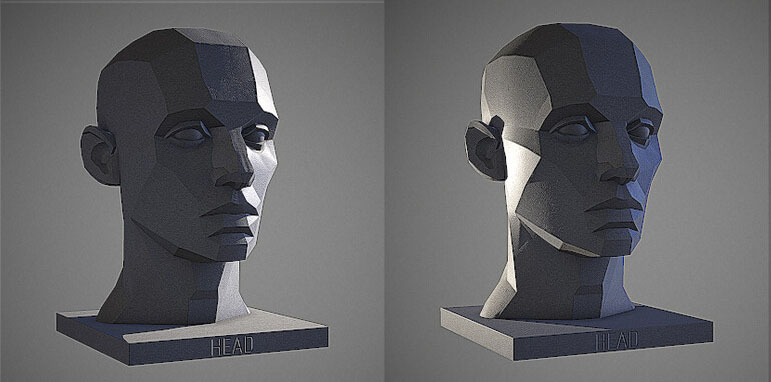
2. Draw the Head with Flat Planes
Instead of drawing curves, use straight lines to describe the head’s angles. Imagine you’re carving the face out of a block of wood. Each straight line represents a plane change — the side of the nose, the slope of the forehead, the turn of the cheek. Start with a simple cube or wedge to understand how light falls on angular forms, then move on to a simplified head (like the Asaro Planes of the Head model). You can even paint over a photo digitally, tracing the major planes to see how light breaks across the surface.
3. Paint in Three Values
Choose one of your portrait references and paint it using only three values: light, middle, and dark. Forget about color — work in grayscale or with a very limited palette. The goal is to model the head using value relationships only. You’ll be surprised how much form and expression you can achieve with just three tones. This exercise helps you understand that planes are what create the illusion of light, not fine details.
Painters throughout history have studied sculptures to understand structure. A plaster cast or a photo of a classical bust can be a great model for learning planes. Since sculptures already emphasize form and light, they make it easier to spot where the head turns. Try sketching them quickly, noting the large shapes and where light breaks across them.
5. Turn the Head
When working from life or a reference, look at the head from different angles — front, three-quarter, and profile. Notice how the planes shift with the light. This habit helps you understand that every portrait is a balance of structure and perspective. The more you draw from multiple angles, the more confidently you’ll be able to invent or correct forms later.
6. Translate Planes into Soft Transitions
Once you can see the planes clearly, start softening them. Real faces aren’t made of hard edges, but understanding where those edges would be helps you create natural transitions. Good portrait painting is all about knowing when to soften and when to keep a subtle edge — and that control begins with a solid sense of planes.
Final Thought
Seeing in planes transforms the way you paint. You stop copying what you see and start building your portraits as if you’re sculpting them with light. Over time, this understanding gives your paintings strength, clarity, and a sense of life that viewers can feel immediately.
Struggling with your portraits? You might find my E-book helpful. Click here
I still remember my very first anatomy class — not because it was technical or intimidating, but because it opened my eyes in a way that changed how I saw every face after that.
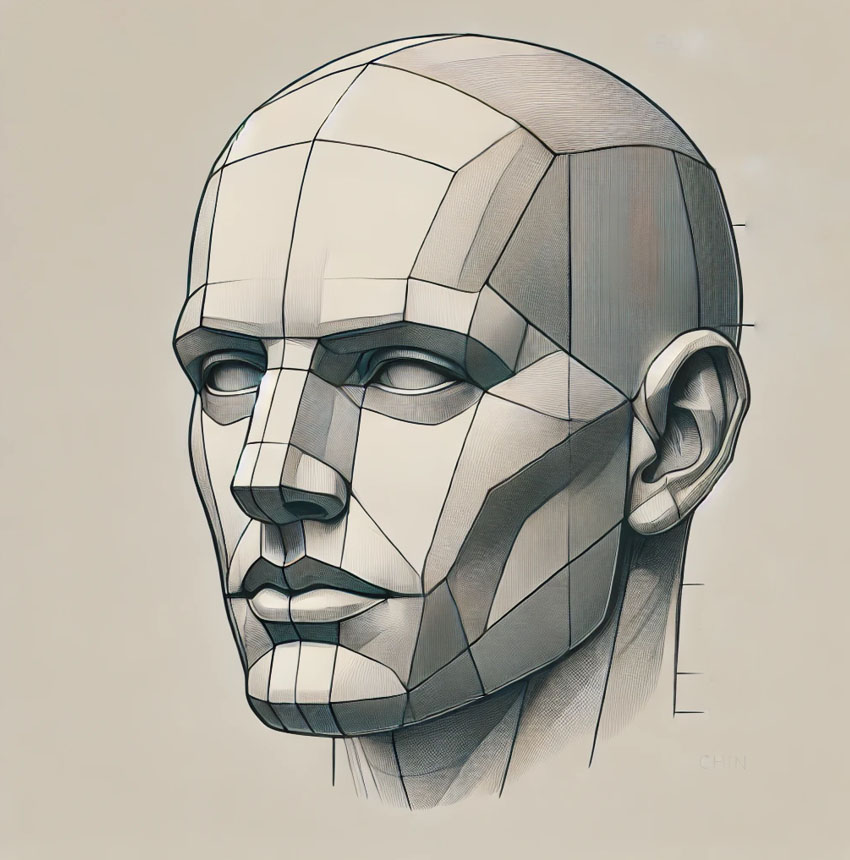
On the table in front of us were two objects: a human skull, and a planar head sculpture — the one used in classical drawing classes to simplify the face into basic geometric forms. At first, they looked like opposites. One was organic, bony, a symbol of mortality. The other was simplified, almost robotic, made up of planes and angles like a blocky mask.
But then the instructor asked us to do something: “Look for the similarities, not the differences.”
And suddenly, it clicked.
The zygomatic bone — the cheekbone — became the flat triangular plane under the eye socket. The brow ridge formed a hard, sloped plane that transitioned into the forehead. Even the jawline, which I always thought of as round and curved, revealed a set of angular planes that echoed the structure beneath the skin.
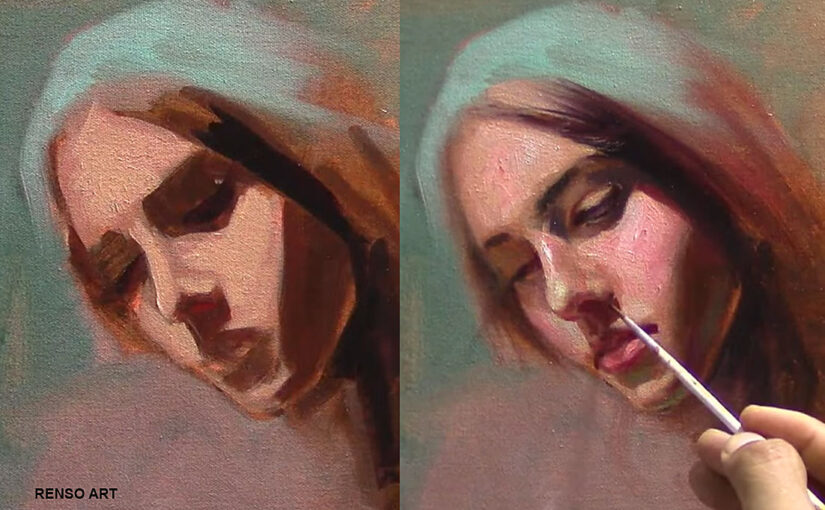
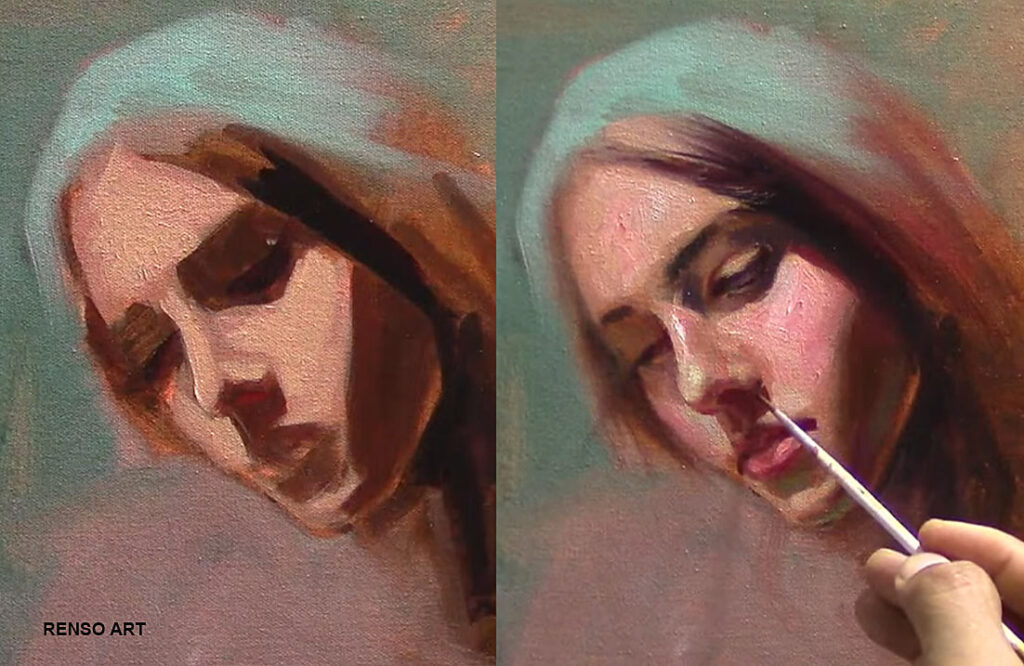
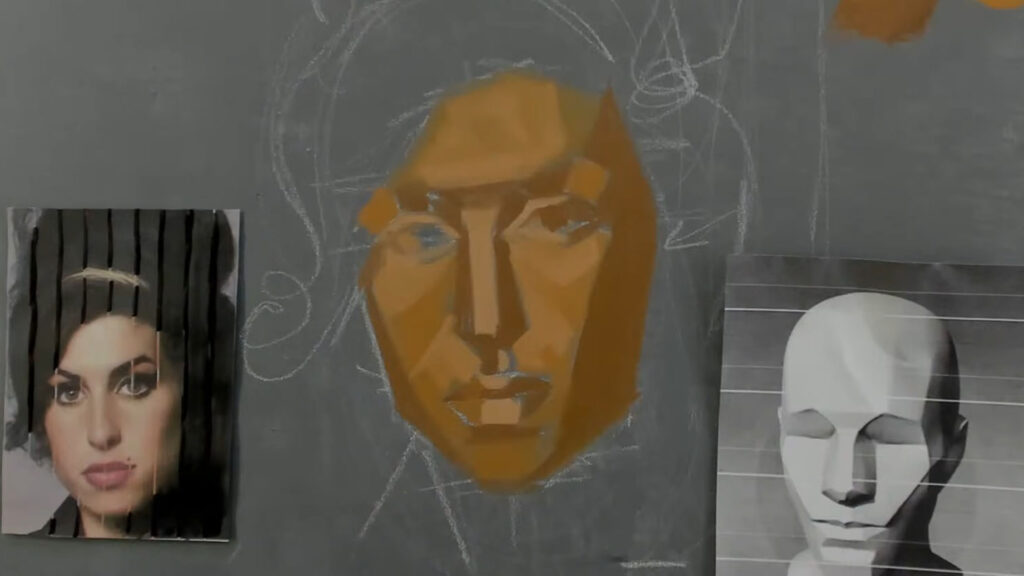
I just painted the upper image on a livestream on YouTube, you can watch it here
That class taught me that anatomy isn’t just about memorizing bones or muscle names (but tried anyway). It’s about seeing structure, understanding how form turns in space, and realizing that every great portrait is built on what’s underneath.
To this day, whenever I paint a portrait, I think back to that skull and that blocky sculpture. And I try to find the balance — the harmony between the reality of bone and the abstraction of planes and practice drawing the planar portrait.
Struggling with your portraits? You might find my E-book helpful. Click here
In my second year at the School of Fine Arts, we started focusing on portraits — drawing them at night, painting in the mornings, and studying anatomy in the afternoons. It was all synchronized to help us get the most out of our training.
I remember trying to memorize every bone and muscle in the face. Don’t do that — I wasted so much time. I wish I had spent that time drawing the bones and muscles instead of trying to recall their names, which I still don’t remember.
Don’t worry about understanding the bone or muscle structure at first — just draw them. The more you draw the skull, the more you’ll begin to see the bone structure beneath the skin. Drawing is like reading: the more you revisit the same book, the more you understand and remember.
Capturing the human face is one of the most challenging — and rewarding — artistic pursuits.
To achieve true realism—or even expressive stylization—you must understand both the geometric planes of the face it means simplified the face into planes and the underlying anatomy that shapes them.
Part 1: The Planes of the Face – Simplifying Complexity
Before diving into anatomy, painters must first grasp the major planes that define facial structure. These planes act as a roadmap for light and shadow, helping artists render form convincingly.
Key Facial Planes in Oil Painting
Forehead Plane – A broad, slightly rounded surface that transitions into the temples. The supraorbital ridge (brow bone) marks a subtle shift in plane.
Orbital Planes (Eye Sockets) – Deep-set, concave areas that influence how light wraps around the eyes.
Nasal Planes – The nose is not a single shape but a series of angular shifts:
The bridge (frontal plane)
The sides (descending into the cheeks)
The tip and nostrils (with subtle curvature)
Zygomatic (Cheekbone) Planes – The most prominent forward-facing planes, affecting how light catches the face.
Maxillary & Mandibular Planes – The upper and lower jaw define the structure around the mouth and chin.
Chin Plane – A protruding form with subtle curves, often overlooked in beginner studies.
Painter’s Tip: When blocking in a portrait, start by massing in these planes with a mid-tone underpainting (such as burnt umber or raw umber). This establishes the foundational light logic before adding color.
Part 2: The Anatomy Beneath – Why It Matters for Oil Painters
The planes don’t exist in isolation—they are shaped by bones, muscles, and fat. Understanding these structures allows for more convincing rendering, especially in subtle transitions and aging faces.
1. Bony Landmarks Every Painter Should Know
Frontal Bone – Dictates forehead curvature.
Zygomatic Arch – The cheekbone’s prominence affects the face’s width and light reflection.
Nasal Bones – Determine the nose’s angle and bridge structure.
Maxilla (Upper Jaw) – Supports the nasal base and upper teeth.
Mandible (Lower Jaw) – Defines the chin and jawline sharpness.
Painter’s Insight: In older faces, bone resorption (loss of bone mass) causes the jawline to recede, altering the planes dramatically.
2. Muscles That Shape Expression & Form
Facial muscles stretch, compress, and fold the skin, creating dynamic forms. Key muscles for painters:
Orbicularis Oculi – Wraps around the eyes, creating folds in laughter or squinting.
Zygomaticus Major & Minor – Pull the mouth into a smile, stretching the cheeks.
Corrugator Supercilii – Creates frown lines between the brows.
Masseter – A thick muscle that bulges when clenching the jaw.
Mentalis – Puckers the chin (seen in doubt or tension).
Painter’s Tip: When painting expressions, observe how muscles pull the skin and create shadows (e.g., nasolabial folds in a smile).
3. Fat Pads & How They Affect Light
Fat distribution varies by age, gender, and genetics, influencing softness and shadow:
Buccal Fat Pad – Gives youthful roundness to cheeks.
Nasolabial Fat – Creates the “smile lines” that deepen with age.
Submental Fat – Softens the jawline (important for rendering realism in portraits).
Painter’s Insight: In older faces, fat loss leads to hollower cheeks and sharper transitions between planes.
Part 3: Applying Planes & Anatomy in Oil Painting
Step 1: Structural Sketching (Grisaille or Imprimatura)
Start with a toned ground (e.g., a warm gray or burnt sienna wash).
Use a brush or charcoal to map the skull structure before adding planes.
Indicate major shadow blocks where planes turn away from light.
Step 2: Blocking in Planes with Limited Palette
Use a monochromatic underpainting (raw umber + white) to establish values.
Keep edges softer in fleshy areas (cheeks, lips) and sharper on bone (brow, jawline).
Step 3: Layering Flesh Tones with Anatomical Awareness
Aged Skin: More pronounced planes, sharper shadows, cooler undertones in recesses.
Gender Differences: Male faces often have more angular planes, while female faces retain softer fat distribution.
Step 4: Final Refinement – Bringing Life to the Portrait
Add subsurface scattering (thin layers of translucent reds/ochres) for realistic skin.
Use broken color (impasto in highlights, glazes in shadows) for depth.
Sharpest details (eyes, lips) should align with anatomical landmarks.
Conclusion: The Painter’s Journey into Facial Mastery
Great portraitists—from Rembrandt to Sargent—knew that light follows anatomy. By studying both the planes and the structures beneath, oil painters can move beyond superficial representation into true realism and expressive depth.
Want to go further?
Practice skull studies to internalize bone structure.
Paint age progressions to see how planes shift over time.
Experiment with different lighting (Rembrandt, split, butterfly) to see how planes react.
Now, pick up your brushes—your next portrait awaits!
Struggling with your portraits? You might find my E-book helpful. Click here
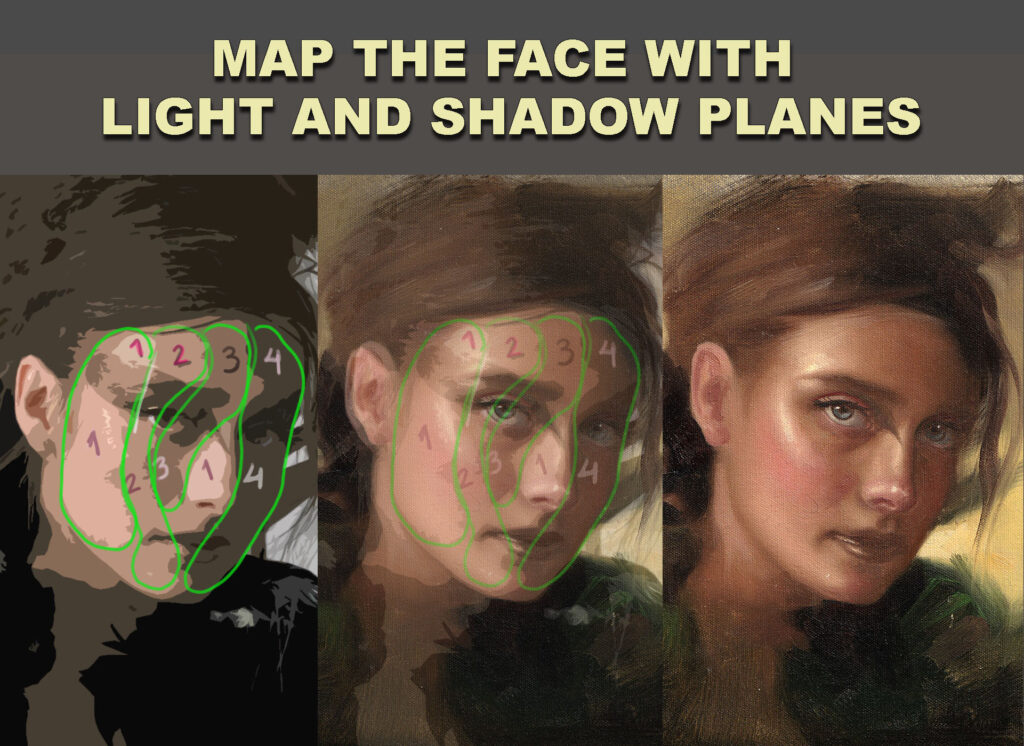
I remember my first drawings and paintings—they were full of details. I tried to paint every eyelash and every wrinkle, and I was always pretty happy with the result, even when my teachers used to say my paintings looked cartoonish and that the shadows were too light, which affected the volume of the face. I didn’t care at the time. But if you want to improve faster, stop trying to paint every single detail. You need simplification first. One of the most powerful ways to gain control and clarity in portrait art is to map the face using light and shadow planes and when you are good at that then paint all the details you want.
What Are Light and Shadow Planes?
The human face isn’t a flat surface—it’s made of intersecting planes that catch light differently depending on the form and light source. By breaking the face down into value-based planes (large areas of light or shadow), you can simplify the complexity and build a strong foundation for a realistic or stylized portrait.
Why Use Planes?
Clarity: You’re not guessing where the shadows go—you’re placing them with purpose.
Form: Planes help you sculpt the illusion of 3D on a 2D surface.
Efficiency: Fewer details, more impact. A well-mapped face reads clearly even with minimal rendering.
Lighting: You gain a better understanding of how different light sources affect facial structure.
How to Start Mapping Planes of the Face
Choose a clear light source. A single light from the top or side works best to define major planes.
Squint at your reference. This helps you see the simplified blocks of light and dark without distractions.
Identify the five main zones:
Forehead
Eye sockets
Nose
Cheekbones
Mouth and chin
Block in flat values. Think of them as large, angular shapes. No blending—just tone masses.
Refine gradually. Once your planes are solid, you can add transitions or details, but only as needed.
Think Like a Sculptor
Imagine you’re carving the face out of clay or wood. Planes help you carve with your brush or pencil, giving volume and depth instead of outlining features. Artists like John Singer Sargent, Andrew Loomis, and contemporary concept artists all use this method to bring portraits to life.
Final Thought
Details are the dessert—structure is the main course. Mapping light and shadow planes of the face gives your work strength, believability, and style. So next time you begin a portrait, don’t dive into eyelashes or smile lines. Start with planes, and let the light do the talking.
Want to see this technique in action? Join me in an upcoming paint-along class or check out my portrait demos on http://www.youtube.com/@RensoArt
Struggling with your portraits? You might find my E-book helpful. Click here
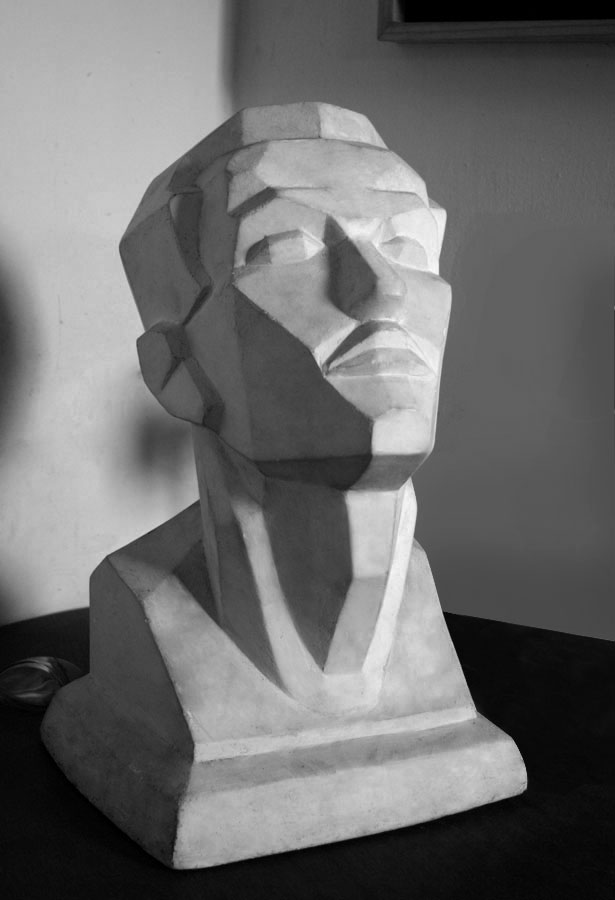
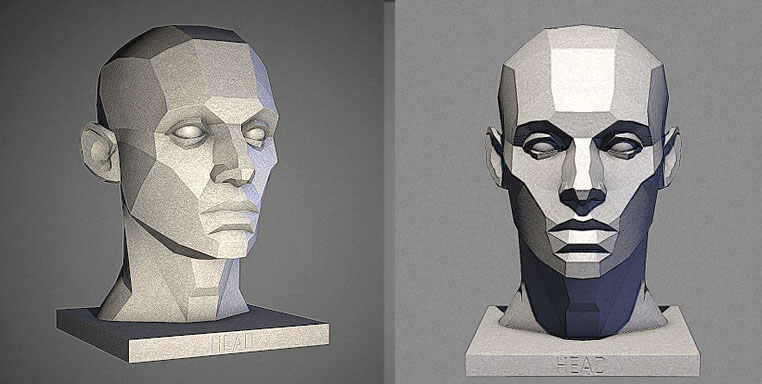
When I was a student I used to practice with a real planar sculpture. the teacher placed the light on the left, rotated the sculpture every 10 minutes, and we sketched with charcoal. After five drawings, He moved the light to the right and repeated the process. It was a practice we used to do once a week. Do not think about perfection is practice, maybe you will find this exercises pretty stressful but practice always pay off.
Understanding the planes of the face is essential for creating convincing portraits. But knowing the planes alone isn’t enough—lighting determines how those planes are revealed or concealed. Different lighting setups dramatically affect how we perceive form, structure, and depth in a portrait.
These are the three lighting setups I practiced as a student, we will see how—front light, rim light, and Rembrandt lighting—interact with the planes of the face. Whether you’re drawing, painting, or sculpting, learning to observe these interactions will help you better capture the illusion of form.
There are more lighting setups than the ones I show in this article, but these are the foundation.
Here is a Planar head I have at home, I did it myself in my first year at the school of art.
🎯 What Are the “Planes of the Face”?
The human face isn’t a flat surface. It’s composed of angled planes—like the slope of the forehead, the curved structure of the cheekbones, or the boxy chin. When light hits these planes at different angles, it reveals form through contrast between light and shadow. That’s what gives a portrait its 3D illusion.
🔦 1. Front Lighting (Flat Light)
I do not like this lighting, we can not see shadows but we need to practice this because we will commissions from photos with this lighting. What I just to do is darken the picture with photoshop to see midtones and shadows
Overview:
Light is positioned directly in front of the face.
Often used in photography for beauty shots or ID photos.
Minimizes shadows, giving a smooth, evenly lit appearance.
Effect on Planes:
Flattens form: Since all planes receive similar amounts of light, depth is reduced.
Subtle transitions: Shadow areas are minimal, so changes between planes become harder to see.
Good for studying color and tone, but not ideal for structural learning.
Best Use:
Reference photos for soft skin tones or subtle shading practice.
Early stages of painting to block in color without distraction.
🌗 2. Rembrandt Lighting
This one is the best for a beginner, is necessary to see contrast to separate the lights from shadows when mix colors.
Overview:
Light is placed at ~45° from the subject and above eye level.
Named after the painter Rembrandt, known for his dramatic portraits.
Creates a triangle of light on the cheek opposite the light source.
Effect on Planes:
Strong light-shadow contrast: One side of the face is lit, the other falls into shadow.
Planes facing the light (forehead ridge, cheekbone, upper lip) catch highlights, while perpendicular planes recede into shadow.
The “core shadow” (where light transitions to shadow) clearly defines the form.
Best Use:
Ideal for studying facial structure and form modeling.
Adds drama and realism to a portrait.
🌙 3. Rim Lighting (Back or Edge Light)
This one is the best when we want to be creative about color, I usually add color to one of the lights, could be orange or blue or any color or a different color for each side.
Overview:
Light comes from behind or the side, grazing the edge of the face.
Often used in cinematography and dramatic portraits.
Creates a glowing outline or “halo” effect.
Effect on Planes:
Highlights edges, but leaves the front planes in shadow.
Obscures form in the central areas of the face.
Excellent for emphasizing silhouette and profile, but poor for revealing internal structure.
Best Use:
Stylized or mysterious portraits.
Studying facial outline and gesture rather than internal planes.
🎨 Side-by-Side Summary of Planes of the face
Lighting Type
Form Visibility
Shadow Contrast
Best For
Front Light
Low (flattens form)
Minimal
Color study, soft portraits
Rembrandt Lighting
High (reveals form)
Strong
Structure, realism, drama
Rim Light
Low (edge-focused)
High at edges
Silhouette, mood, stylization
🧠 Final Thoughts
As artists, we don’t just copy what we see—we interpret and design. Understanding how lighting affects the planes of the face empowers you to choose references more wisely, control your compositions, and make more convincing portraits.
Next time you work from a reference or live model, ask yourself: Which planes are catching light? Which are turning away? And how is this lighting setup helping—or hiding—the form?
Let light be your teacher, and the planes of the face your map.
Struggling with your portraits? You might find my E-book helpful. Click here
Alright, let’s get into it. Painting a portrait is like building a house—you need a solid foundation, and in this case, that foundation is the planes of the face. These planes are the flat and curved surfaces that make up the structure of a face. Think of them as the puzzle pieces that, when put together, create a realistic, three-dimensional likeness. But here’s the thing: it’s not just about drawing the eyes, nose, and mouth in the right place. It’s about understanding how light and shadow interact with those planes to give the face its form and depth. So, let’s break it down, step by step, and keep it casual while we’re at it.
Starting with the Basics: The Center Line
Every portrait starts with the center line. This is the imaginary line that runs vertically down the middle of the face, dividing it into two symmetrical halves. But here’s the kicker: faces aren’t perfectly symmetrical. One eye might be slightly higher, the nose might tilt a little, or the mouth might curve more on one side. So, while the center line is your guide, you’ve got to be flexible with it.
As I was working on this portrait, I kept checking the center line, the eye line, the nose line, and the mouth line. It’s like a constant dance—you’re always measuring, adjusting, and re-measuring. And don’t even get me started on the triangle formed by the eyes and the nose. That triangle is your best friend when it comes to getting the proportions right. If the triangle is off, the whole face feels wrong.
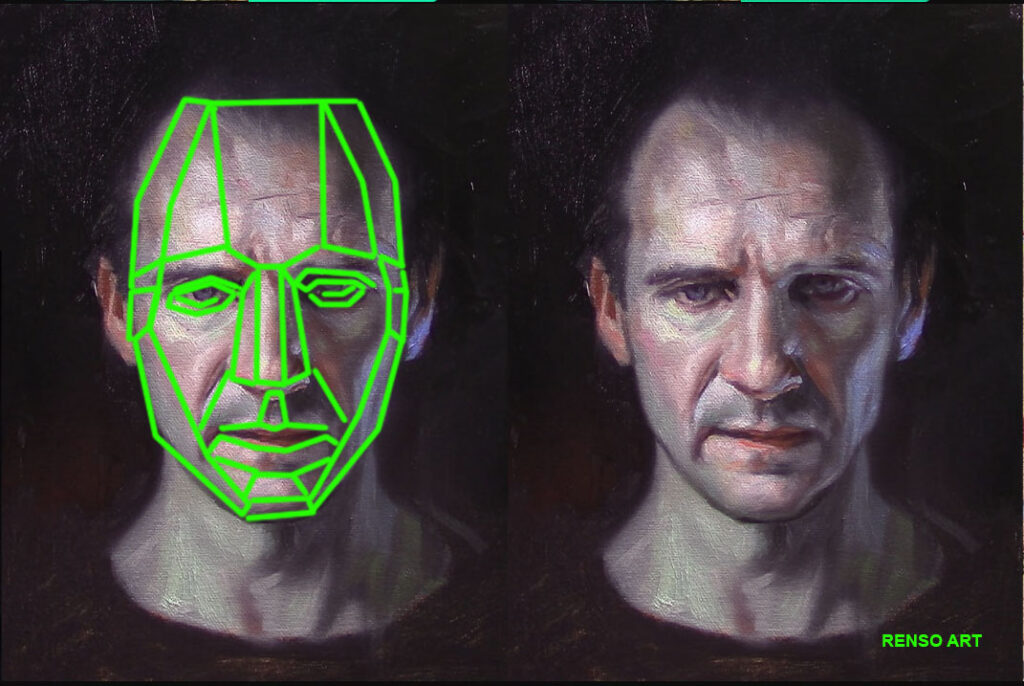
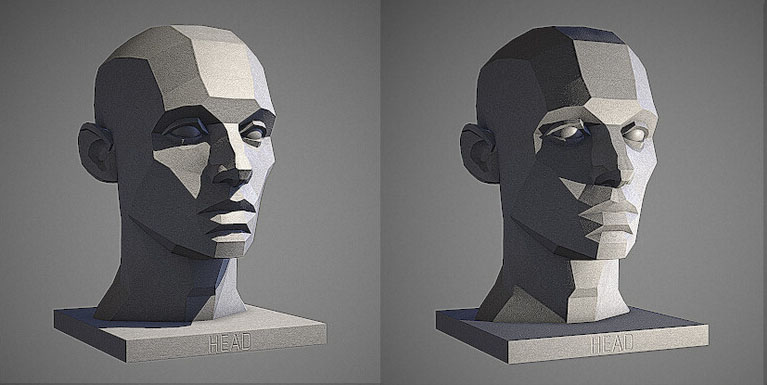
Studying the planes of the face is essential for understanding structure, form, and light in portrait painting. Breaking the face into simplified geometric planes helps in achieving depth and realism. Here’s a breakdown of the key planes:
1. Major Planes
These are the broadest divisions of the head, which establish the overall structure:
Front Plane – The face’s flat front surface.
Side Planes – The areas that wrap around from the temples to the cheeks.
Top Plane – The forehead and upper skull.
Bottom Plane – The underside of the chin and jawline.
2. Primary Facial Planes
These define the major shapes within the face:
Forehead Plane – Often divided into the upper, middle, and lower sections.
Cheek Planes – The prominent areas that catch light, shifting toward shadow at the edges.
Eye Sockets – Recessed areas that define the brow ridge and contribute to facial depth.
Nose Planes – The bridge, sides, and bottom of the nose have distinct planes.
Mouth Area Planes – The upper lip angles inward, while the lower lip has fuller, rounded planes.
Chin and Jaw Planes – These define the transition between the face and neck.
3. Light & Shadow Considerations
Understanding planes helps control how light interacts with the face:
Flat planes catch more light (like the forehead and cheekbones).
Angled planes create shadows (such as the sides of the nose and under the jaw).
Subtle transitions between planes give a realistic form.
How to Study the Planes of the Face
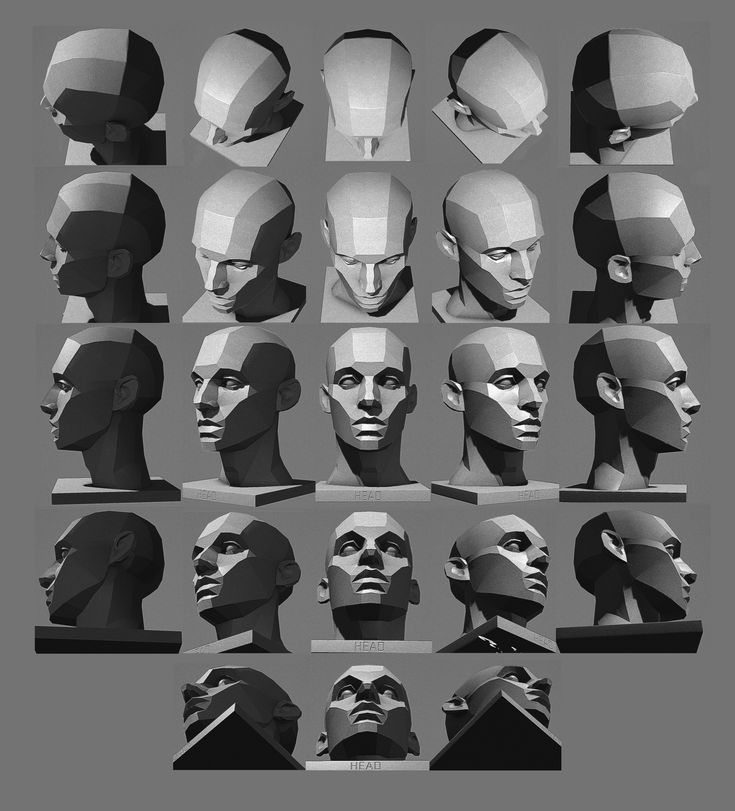
Use Asaro Heads (Planes of the Head models) for a simplified geometric approach.
Practice sketching faces in blocky, angular forms before softening into natural curves.
Use lighting from different angles to observe plane changes.
Sculpting (even digitally) can reinforce your understanding of form.
Mixing Colors: The Art of Skin Tones
Now, let’s talk about skin tones. Mixing the perfect skin color is like trying to find the right spice blend for a recipe—it’s all about balance. You start with a base color, something close to the person’s skin tone, but then you tweak it. A little more red for the cheeks, a touch of yellow for warmth, maybe a hint of blue for cooler areas like the shadows under the chin or around the eyes.
But here’s the thing: skin isn’t just one color. It’s a symphony of tones. The forehead might be a bit yellower, the cheeks pinker, and the shadows around the jawline cooler. And don’t forget about local color—that’s the base color of an object before light and shadow affect it. For skin, the local color is usually somewhere between peach, pink, and ochre, depending on the person.
I spent a lot of time mixing variations of the base color—lighter versions for highlights, darker versions for shadows, and more saturated versions for areas like the cheeks and lips. And sometimes, I’d throw in a wild card, like a touch of blue or green, just to see how it would affect the overall harmony. It’s all about experimentation.
Shadows and Highlights: Creating Depth
Shadows are where the magic happens. They give the face its three-dimensionality. But not all shadows are created equal. Some are warm, some are cool, and some are neutral. It depends on the light source and the surrounding colors. For this portrait, I kept the shadows relatively neutral, but I added a touch of warmth to areas like the nose and cheeks to make them pop forward.
Highlights, on the other hand, are all about catching the light. The brightest highlights are usually on the forehead, the bridge of the nose, the cheekbones, and the chin. But here’s a pro tip: don’t make your highlights pure white. Mix a bit of yellow or pink into the white to keep it natural.
The Eyes: Windows to the Soul
The eyes are the focal point of any portrait. They’re what people look at first, so you’ve got to get them right. But here’s the thing: eyes aren’t just white with a colored iris. They’re full of subtle colors and reflections. The whites of the eyes, for example, are rarely pure white. They’re usually a bit gray or yellowish, especially in shadow.
I spent a lot of time on the eyes, adding tiny highlights to make them look alive. And don’t forget the eyelids—they’re warmer and more reddish than the rest of the skin because they’re thinner and have more blood vessels. But you’ve got to be careful not to make them too red, or it’ll look like the person has been crying.
The Nose and Mouth: Balancing the Features
The nose and mouth are just as important as the eyes, but they’re often overlooked. The nose, for example, has its own set of planes—the bridge, the sides, the nostrils, and the tip. Each plane catches light differently, so you’ve got to pay attention to the transitions between light and shadow.
The mouth is another tricky area. It’s not just a line with some color inside. It’s a complex shape with its own highlights and shadows. The upper lip is usually darker than the lower lip, and there’s often a subtle highlight on the lower lip that gives it a moist, natural look. And don’t forget the corners of the mouth—they’re usually a bit darker and can add a lot of expression to the face.
Hair and Background: Framing the Face
Hair can make or break a portrait. It’s not just a mass of color—it’s made up of individual strands that catch light and create texture. But for this portrait, I decided to keep the hair relatively simple. I didn’t want it to distract from the face. Instead, I focused on getting the shape and volume right, adding a few highlights here and there to suggest movement.
The background is another important element. It’s not just empty space—it’s part of the composition. I added a bit of yellow to warm up the background, but I’m not sure if I’ll keep it. Sometimes, a neutral background works better because it keeps the focus on the face.
Knowing When to Stop
Here’s the hardest part of painting a portrait: knowing when to stop. It’s so easy to keep tweaking and adjusting, but at some point, you’ve got to step back and say, “It’s done.” Overworking a painting can ruin it. You start losing the freshness and spontaneity that make it come alive.
I’ve learned to trust my instincts. If something feels off, I’ll fix it. But if it feels right, I’ll leave it alone, even if it’s not perfect. Because here’s the thing: perfection is overrated. What matters is capturing the essence of the person—their expression, their personality, their soul.
Final Thoughts
Painting a portrait is a journey. It’s about more than just getting the proportions and colors right. It’s about capturing a moment, a feeling, a story. And the planes of the face are your roadmap. They guide you through the process, helping you build the structure, add the details, and bring the face to life.
So, next time you’re painting a portrait, take a moment to study the planes of the face. Pay attention to how light and shadow interact with them. And most importantly, have fun with it. Because at the end of the day, painting is about expressing yourself and connecting with the world around you.