Struggling with your portraits? You might find my E-book helpful. Click here
In every painting, there’s a moment where your eye stops—where it lands and lingers. That’s the focal point. Whether you’re working on a still life with a bunch of grapes and a vase, or a quiet landscape at dusk, the focal point is what holds the viewer’s attention and gives structure to the entire composition.
Let’s break it down with examples from my classes.
What is a Focal Point?
The focal point is the area of a painting that draws the viewer in first. It’s where the visual weight is centered. That doesn’t mean the rest of the painting isn’t important, but the focal point is your main “story moment.”
Think of it like a stage play: you might have several characters on stage, but only one is delivering the key line. Everything else supports that moment.
In many of my still life classes, we use objects like fruit, vases, or folded fabric. The challenge is always the same: which object tells the story?
Let’s say we have a lemon, a glass bottle, and a crumpled napkin. If the lemon is your focal point, you might:
- Place it off-center using the Rule of Thirds
- Make it the most saturated color in the scene
- Sharpen the edges and contrast around it
- Simplify the surroundings to avoid distraction
In class, we painted a composition where the light hit a lemon just perfectly, and we built the rest of the scene to support that lemon—softening edges around the background, muting other colors. It made the painting feel focused.

Focal Point in Landscapes
Landscapes can be trickier, because everything feels important—sky, mountains, trees. But here’s the trick: choose a “moment.”
In one class, we painted a path leading into the woods. The focal point was not the trees or the sky, but a small patch of light hitting the path. We:
- Directed the lines of the path toward that light
- Used higher contrast where the light met the shadow
- Toned down the sky to keep attention on the ground
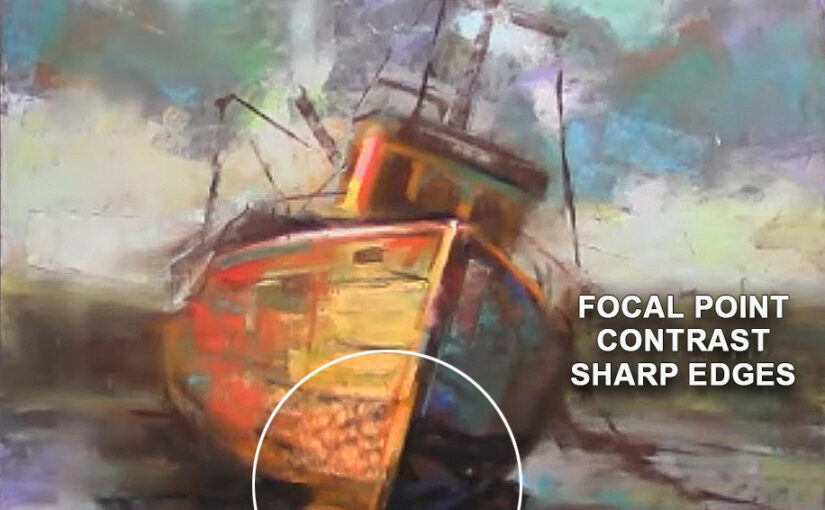
Another example: a ship, its color and placement made it the natural focal point. Everything else—the muted water, the gentle sky—helped guide the eye there.

Common Ways to Create a Focal Point
Here are some tools we use regularly in class:
- Contrast – Light against dark, or warm against cool, draws attention.
- Detail – Sharper edges and more texture pull the eye in.
- Color – A pop of saturated or unexpected color stands out.
- Placement – Objects near the Rule of Thirds lines feel naturally strong.
- Leading Lines – Paths, shadows, or objects pointing toward your subject.

Final Thoughts
If your painting feels scattered, ask yourself: Where do I want the viewer to look first? That question alone can clarify a lot.
Every time we paint together in class—whether a bowl of peaches or a mountain trail—I encourage students to make a clear decision about the focal point. It doesn’t mean being rigid, but it gives your painting purpose and clarity.
Next time you set up a composition, try this: squint, step back, and see what jumps out. Then, build your painting around that.
See you in class,
—Renso
Thank you!
Thank you!
Thank you!
Thank you Renso.