Struggling with your portraits? You might find my E-book helpful. Click here
Understanding Warm and Cool Planes of the Face
The first time I tried to paint temperature shifts, I completely overdid it. I remember being excited — I had just learned about warm and cool colors and wanted to apply it right away. I loaded my brush with orange and crimson for the lights, and deep blue for the shadows. When I stepped back, the portrait looked like it had been sitting too long in the sun — the colors were loud, disconnected, almost burning against each other. That day I realized something important: temperature is not about intensity, it’s about balance. The beauty of warm and cool lies in how gently they meet, not in how far apart they are.
When we talk about the planes of the face, we usually think about structure — how light falls across the forehead, nose, cheeks, and chin. But light doesn’t just describe form; it also changes color temperature. Understanding how warm and cool light affects the planes of the face can completely transform your portraits. It helps you create skin that feels alive, balanced, and believable.

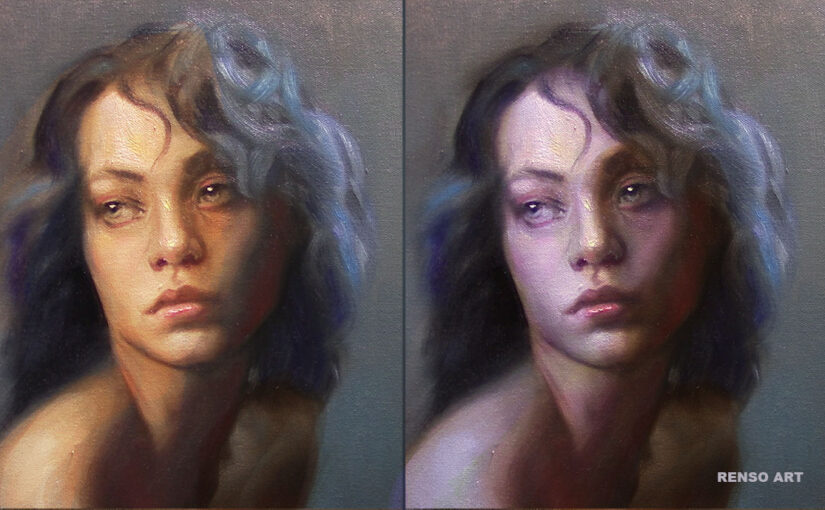
When light is warm — like sunlight or a soft lamp — the illuminated planes of the face tend to carry warm tones: golden yellows, pinks, and oranges. The shadows, in contrast, often become cooler, with hints of blue or violet. In cool light, like daylight on a cloudy day, the effect is reversed — the lights appear cooler and the shadows warmer. This temperature contrast is what gives portraits depth and natural harmony.
A simple way to practice this is by painting a head study under different lighting setups. Try one portrait with a warm light source, such as a lamp, and another with cool daylight. Keep the same model or reference so you can see the difference more clearly. Focus on how the light planes shift — the forehead might appear more yellow under a warm lamp, while under cool light, it leans toward gray-blue. The side planes of the cheeks, where light begins to turn, are where this temperature transition becomes most beautiful.

Remember, you don’t need to exaggerate it. Even small temperature shifts between light and shadow can make a huge difference. Think of it like music — the notes are subtle, but together they create harmony. When you combine an understanding of the planes of the face with sensitivity to warm and cool light, your portraits gain that natural glow that feels real and full of atmosphere.
Practice: Studying Warm and Cool Planes
1. Paint Two Studies of the Same Head
Set up a simple bust or photo reference and paint it twice — one under a warm light (like a yellow bulb or candlelight) and one under cool daylight or a bluish lamp. Use a limited palette so you focus more on temperature than on color variety. Compare how each version changes the mood and structure.

2. Observe Light in Daily Life
Pay attention to people’s faces in different environments — early morning sunlight, cloudy daylight, or indoor lamps. Try to notice where the planes turn warm or cool. You can take quick notes or sketches to train your eye to recognize these subtle shifts.
3. Practice with Three Values
Use only light, midtone, and shadow, but shift temperature instead of value to create form. For example, keep the light warm and the shadow cool (or the other way around). This helps you see how temperature alone can describe the planes of the face.
The more you observe and paint from real light, the more natural these shifts will feel. Warm and cool tones are like the breath of the portrait — gentle, balanced, and full of life.
- Why Short Portrait Sessions Are One of the Most Valuable Practices for Painters
- From Planes to Realism: How to Soften Structure Without Losing Form
- How to Paint Planes of the Face in Warm and Cool Light
- Top 5 Mistakes Beginners Make in Portraits
- How to Self-Critique Your Own Paintings
Thank you for the painting tips. Appreciated. Colin.
Thank you. Colin.