From Planes to Realism: How to Soften Structure Without Losing Form

Struggling with your portraits? You might find my E-book helpful. Click here

When we first learn to paint the planes of the face, everything can look a little too hard — like carved stone. It’s normal. At the beginning, we focus on defining the structure, finding those clear divisions between light and shadow. But as we grow, the challenge becomes learning how to keep that structure while making the transitions soft and natural. That’s where realism begins.

The goal isn’t to erase the planes, but to understand them so well that you can blend them without losing their direction. Every soft transition you paint still belongs to a specific plane — it has an angle and a purpose. When you keep that in mind, your portraits stay solid even when the edges melt beautifully into the light.

One thing that helped me was thinking of the face as a sculpture covered with thin fabric. The fabric wraps softly around the form, but the structure underneath never disappears. When you blend too much, it’s like covering the sculpture with a heavy blanket — all the shapes vanish. So instead of blurring everything, try to keep some edges alive. Let some planes meet sharply, and let others fade slowly. This balance gives your portraits both clarity and softness.


How to Soften the Planes Naturally

1. Blend with Purpose
When you blend, ask yourself what direction the plane is turning. Don’t just move the brush randomly — follow the form. A small circular motion might flatten the area, while a longer stroke in the right direction keeps the structure clear.

2. Keep Value Control
Soft edges don’t mean muddy values. If the value jump between planes is too small, everything will look flat. Keep your light and shadow families separate, and soften only the edges that belong between them.

3. Vary Your Edges
Real faces have sharp, medium, and soft edges. For example, the edge between the nose and cheek can stay sharp, while the transition on the forehead can stay soft. This variety gives the portrait rhythm and realism.

4. Observe the Light Source
Soft light creates gentle transitions; hard light keeps edges crisp. When painting from life or photos, adjust your edges to match the lighting. This keeps the painting truthful to the source.


Practice: Keeping the Planes Alive While Blending

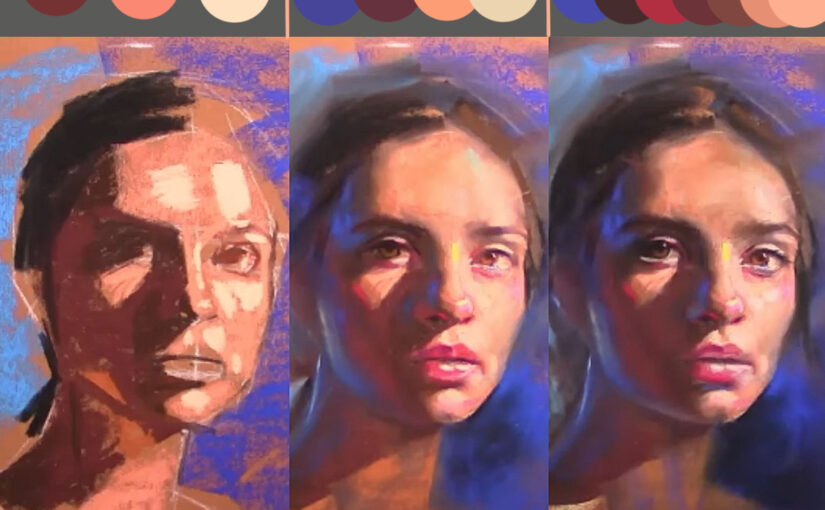
1. Block-In First, Blend Later
Start with strong, clear planes — don’t worry about softness yet. When your structure looks solid, then begin to blend carefully, keeping the direction of the planes. This helps you maintain form even as you refine.

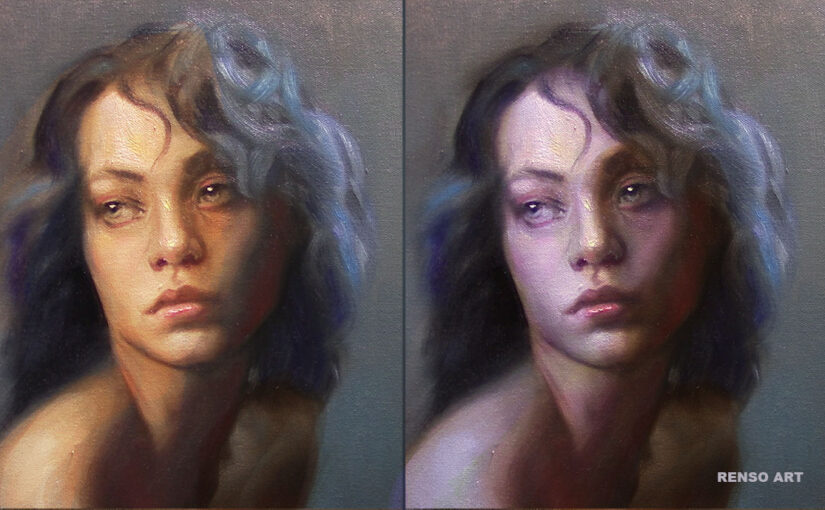
2. Paint Half the Face Hard, Half Soft
This is a great exercise. Paint one side of the face with sharp edges and the other side softly blended. Then try to meet in the middle — balance both sides until the portrait feels realistic but still solid.

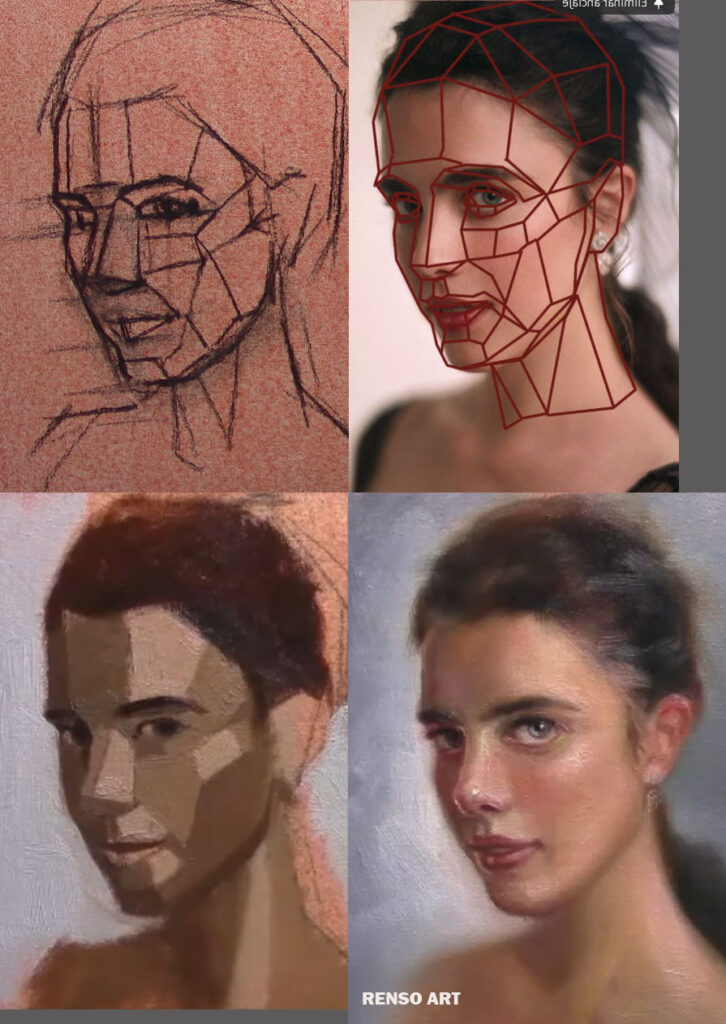
3. Use the Brush Like a Sculpting Tool
Think of each stroke as carving or wrapping around the head. Use the side of the brush for soft transitions and the tip for crisp accents. Small variations in pressure can make all the difference.


When you learn to soften without losing the structure, your portraits start to breathe. The planes are still there — guiding the light, shaping the expression — but now they feel alive under the paint. Realism is not about copying the surface; it’s about understanding the form and letting light reveal it gently.


How to Paint Planes of the Face in Warm and Cool Light

Struggling with your portraits? You might find my E-book helpful. Click here

Understanding Warm and Cool Planes of the Face

The first time I tried to paint temperature shifts, I completely overdid it. I remember being excited — I had just learned about warm and cool colors and wanted to apply it right away. I loaded my brush with orange and crimson for the lights, and deep blue for the shadows. When I stepped back, the portrait looked like it had been sitting too long in the sun — the colors were loud, disconnected, almost burning against each other. That day I realized something important: temperature is not about intensity, it’s about balance. The beauty of warm and cool lies in how gently they meet, not in how far apart they are.

When we talk about the planes of the face, we usually think about structure — how light falls across the forehead, nose, cheeks, and chin. But light doesn’t just describe form; it also changes color temperature. Understanding how warm and cool light affects the planes of the face can completely transform your portraits. It helps you create skin that feels alive, balanced, and believable.

When light is warm — like sunlight or a soft lamp — the illuminated planes of the face tend to carry warm tones: golden yellows, pinks, and oranges. The shadows, in contrast, often become cooler, with hints of blue or violet. In cool light, like daylight on a cloudy day, the effect is reversed — the lights appear cooler and the shadows warmer. This temperature contrast is what gives portraits depth and natural harmony.

A simple way to practice this is by painting a head study under different lighting setups. Try one portrait with a warm light source, such as a lamp, and another with cool daylight. Keep the same model or reference so you can see the difference more clearly. Focus on how the light planes shift — the forehead might appear more yellow under a warm lamp, while under cool light, it leans toward gray-blue. The side planes of the cheeks, where light begins to turn, are where this temperature transition becomes most beautiful.

Remember, you don’t need to exaggerate it. Even small temperature shifts between light and shadow can make a huge difference. Think of it like music — the notes are subtle, but together they create harmony. When you combine an understanding of the planes of the face with sensitivity to warm and cool light, your portraits gain that natural glow that feels real and full of atmosphere.


Practice: Studying Warm and Cool Planes

1. Paint Two Studies of the Same Head
Set up a simple bust or photo reference and paint it twice — one under a warm light (like a yellow bulb or candlelight) and one under cool daylight or a bluish lamp. Use a limited palette so you focus more on temperature than on color variety. Compare how each version changes the mood and structure.

2. Observe Light in Daily Life
Pay attention to people’s faces in different environments — early morning sunlight, cloudy daylight, or indoor lamps. Try to notice where the planes turn warm or cool. You can take quick notes or sketches to train your eye to recognize these subtle shifts.

3. Practice with Three Values
Use only light, midtone, and shadow, but shift temperature instead of value to create form. For example, keep the light warm and the shadow cool (or the other way around). This helps you see how temperature alone can describe the planes of the face.

The more you observe and paint from real light, the more natural these shifts will feel. Warm and cool tones are like the breath of the portrait — gentle, balanced, and full of life.